First thoughts – Part I of II ( Update : Part II now available here ) The new Nikon 300 AF-S was finally updated earlier this year to the VR (vibration reduction) version. This update was more or less expected, even though the older AF-S non-VR version was very, very good optically. The older version was (and still remains) a fairly low-cost way to “get to” the 400 mm focal length – considered a bare minimum for many wildlife photographers. Of course, this focal length is only achieved with this lens by adding a 1.4 teleconverter, thereby reducing the aperture to f/5.6 (yes, it actually gets you to 420mm). I used the older non-VR version for several years and managed to churn out quite a few good bird images with it.
Nikon 300mm f/4 AF-S E VR (image Nikon USA)
What was not expected with this new release was the size reduction of the new lens. Indeed, going from 1440 grams down to 755 grams and losing about 7 cm in length represents quite an innovative leap, especially when considering the addition of VR to the lens. The secret to this size reduction is the use of Fresnel elements, instead of some heavier glass elements. If the quality of this lens were to match the older version, in a package weighing half as much, with vibration reduction, then this lens was too good to be true and would be destined to be a hot seller for Nikon. Unfortunately, 2 problems plagued the release of the lens;
the VR system was wreaking havoc at lower shutter speeds of between 1/60 – 1/120 (where it would actually be used), and
Nikon bungled the recall / service alert on affected lenses (up to serial number 205101) by requiring owners to ship the lens to Nikon for a firmware update, and also… wait for it… at the customer’s expense. Ouch. Considering the recent string of bad PR linked to recent camera releases (D600, D800, D750…), you’d really think that they would at least offer to pay for 2-way shipping costs.
I’ve personally never been affected by these issues – because I’ve learned not to be an early adopter. Sure, sometimes I would like to be able to order a hot-off-the-shelf version of a new Nikon product, but I’ve learned that I’m much better off waiting 5-6 months (at least) before the product is used by actual consumers & pros and reviewed by trusted reviewers. Anyhow, after seeing the specs for this lens I know it would eventually find a spot in my bag – as long as initial real-world reports were positive. With the exception of the VR issue, which should no longer affect models coming off the assembly line… 9 months after its release, I finally took the plunge and got myself a copy. Serial number 212xxx. Out of the box and 5 minutes later my first shots were tests at shutter speeds of between 1/25 and 1/200 with VR ON… and I’m happy to report that my copy is unaffected by the VR bug. Whew. While I’ve only had good experiences with Nikon Switzerland for service and repairs (as an NPS member), nobody likes sending in a new product for a mandatory service in the first week of ownership. This post is not a complete review, but let me just say that this lens is simply a joy to use and is quickly living up to its expectations. While I don’t mind carrying heavier gear for dedicated wildlife outings or sporting events, having a quality optic like this as a walk-around package for city walks and day hikes is a real game-changer. The autofocus performance is what you expect from modern AF-S Nikkors – very good (though not the same performance as its big-brother, the f/2.8 which I use frequently). I shot a kid’s rugby tournament with it last week and it performed very admirably (for comparison, for kids’ rugby – on smaller fields – I’ll usually use a 70-200 f/2.8 + TCs, and/or a 300 f/2.8 + TCs). I’m using it on a D4 and a D810. Subjectively speaking, image quality and sharpness is excellent at closer distances of roughly 10-30 meters and still very good at mid to longer ranges. You can shoot wide open at f/4 and get very good results. I have read reports that it performs best at f/5.6 – f/7.1 and I’m not going to contest that at all. I’ll be shooting at f/4 without hesitation and only higher when I need more depth of field. I’ve also done some casual testing with all three Nikon AF-S tele-convertors and I’ll have some sample images to post in part II of this mini-review in a few days. In the meantime, here’s a sample image from this week – a sparrow waiting for some lunch… feather detail! Standard sharpening, saturation and contrast applied. Click on the image to download a full-resolution version (taken with D810 in 1.2x crop mode). And don’t forget to drop back for Part II in a few days (Update: part II now available here) For complete, thorough reviews of this lens I recommend you go here and here.
Click to enlarge and see shooting data. For full resolution image, right-click and choose “Download link file… (or similar)”
Recently I’ve casually discussed the idea of photo/data backup with friends and colleagues and quite frankly I am astounded at how much faith they place in a single hard drive computer system. Not just for photos, but everything. As in… no backup whatsoever. Ouch. Hey it’s only your memories, right? This post addresses some weaknesses in the management of digital assets (photo, video) and offers some suggestions so that you, as a casual or enthusiast photographer, can add redundancy in an effort to avoid loss of data.
Let’s get one thing out of the way up front :
Sooner or later all hard drives will die.
And a corollary to that statement :
Sooner or later all hard drives will die, and all data thereon will die with them.
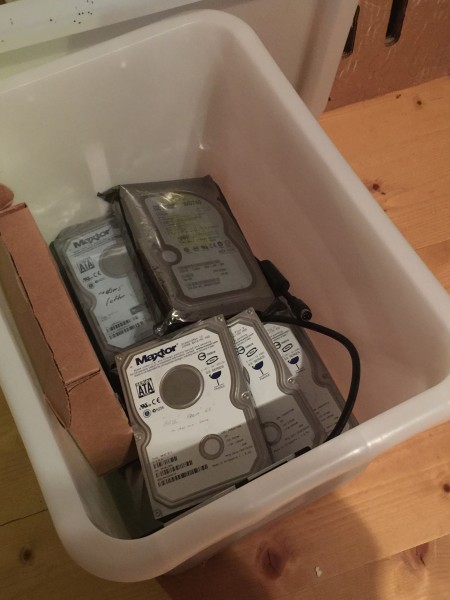
Yep, that should scare the crap out of you if your photos/data mean anything at all to you, and if you indeed have placed all of your eggs photos in one basket hard drive. I won’t go into the elegant details of exactly how mechanically spinning drives function, but well… let’s just say that it’s a matter of nanometers that distances the write-head from the rapidly spinning disk that contains all your precious memories and/or clients’ images. That disk is usually spinning at somewhere between 5400 and 10’000 RPM. You can google the terms “hard drive flying height” if you’re interested. BTW… a nanometer is roughly the size of a virus, so even a human hair (100 microns) or a fingerprint can easily cause nasty things to happen at that scale and spin speeds. And, as such is the case with all high-tech manufacturing, all devices are built to spec within defined tolerances, and hard drives are not built to last as long as, say your car. As a matter of fact, as I write this, I am looking at a box with no less than 5 dead drives from the past 10 years. Don’t believe me? Here they are:
All dead.
Firstly, I am nowhere near what you would call a “prolific” shooter. As a matter of fact, I’m quite selective about when I pull the trigger, and rarely will you catch me mashing down on my shutter button, churning out frame-after-frame (I’m generally a “short burst shooter”, unless the situation calls for more frames). I can thank my photo apprenticeship on film cameras for that ($). However, I do shoot RAW format and have done so since 2007. Why do shoot RAW format? The short answer is that I like to eek out the most quality of my images. Although jpeg compression can provide very good quality images, it is still a lossy format and you are essentially throwing away data (quality) in exchange for smaller files. The raw format is basically the entire data set that the camera sensor captures when taking a photo, including a higher color gamut (more colors). Also, recovery of shadow details is much easier in RAW. However, there is no free lunch since RAW files are quite big (file size). In the case of a 36 MP D810 (Nikon), for example, images will weigh in at roughly 50-60 MB per photo (depends on your RAW settings). This adds up quickly if you shoot a few times per week, even casually. And even as a casual shooter, my data storage needs have grown by a factor of 10 in the past 7 years. You’d better have some redundant storage and backup strategies in place, also with room to grow.
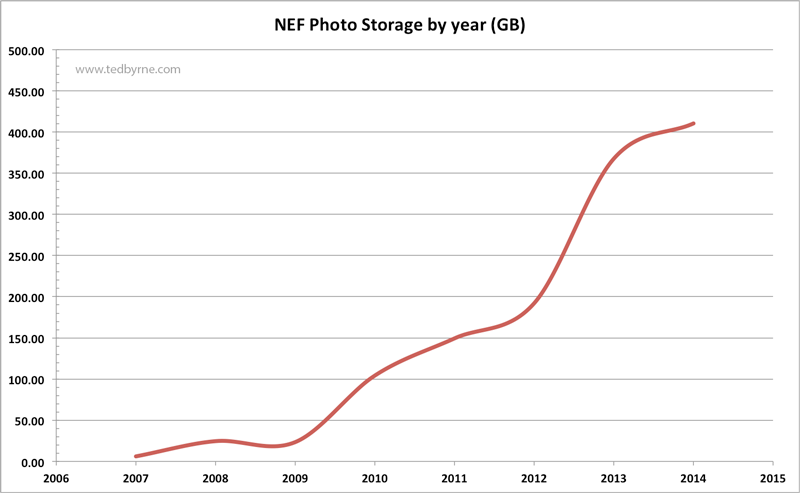
I started shooting digital in 2001 with a Coolpix 950, only in jpeg, of course. To put numbers into perspective, between 2001 to mid-2007 I shot a total of 46 GB of jpeg data with that 2 MP camera (I also shot film with other camera bodies). In June 2007, I purchased my first DSLR and switched to the RAW format. The following graph says the rest (NEF = Nikon RAW format, aka Nikon Electronic Format. Canon’s format is called CR2)
So in 2014 I shot just over 400 GB of RAW data, roughly 9 times what I shot digitally in my first 5 years going digital. As I write this in early November, I ‘m currently at about 500 GB in new NEF so far for this year.
This is only my RAW library. If I add all exported jpegs, iPhone/iPad backup, web galleries, 16-bit TIFFs, and large PSD edits and stitched panoramic files from the last few years, the actual storage capacity almost doubles. I estimate that I’m currently sitting with about 2 TB of combined photo data, as well as about 2 TB of other data (mostly video). That’s a heck of a lot of 1’s and 0’s for a casual shooter like myself.
What about managing and storing that data? Well, shuffling around gigabytes of data needs a fast network – so no… not wireless – we’re just not there yet. You’re going to need fast hard drives, and a fast, wired network – at least USB 3 or Thunderbolt if you’re just doing computer-to-hard drive transfers; Gigabit Ethernet if you’re on a wired LAN.
This is a schematic of my current working environment in my home office (which also ties into a Plex media centre, iTunes server and a family iMac computer). Since I tend to work on both an iMac and a Mac Mini I’ve included both if them in the overall sketch.
Digital Working Environment
Seems like a lot of arrows there, but it’s pretty simple once you break it down – you’ll see that I maintain one main repository for all my media – the Synology 712+ with a DX 213 expansion bay NAS (basically another name for a server). I’ve been using a various NAS brands for several years, and I’ve settled on the Synology brand because they are simply workhorses, and you don’t need to be an IT expert to set-up and maintain it (some experience helps though). At the time of purchase, the 712+ model was the best quality and speed for my price point. The DX expansion pack was added later when I needed room to grow, by adding 2 more drives and expanding the RAID. Maybe I’ll write up the NAS configuration in other post, but basically, a “RAID 5” configuration allows for 1 disk failure without losing any data. This is not the same as a true back-up strategy, however, but this redundancy simply permits you to replace a dead or dying drive asap, while your data remains intact on the NAS. The NAS will beep and send you an email when drives start failing regular self-checks.
Now the important part…
You’ll see in my drawing above that the NAS is actually mirrored daily to a local drive (WD Book) with an automated script (using ChronoSync). AND, then that mirrored WD Book data is itself mirrored to another drive once a week, which is moved off-site to my office… about 25 km away from my home.
Moral: Create meaningful, physical distance between redundant sets of important data, as soon as possible and on a regular basis.
But I don’t want to deal with a NAS…
OK, not everyone wants or needs a RAID server. But even if you’re using only a single computer, I would strongly advise these critical, minimal backup points for all photo enthusiasts. Consider these points the CliffsNotes version of what you should be considering as a back-up strategy:
If you have a camera with dual-slot memory cards, configure the second one for jpeg. There, you already have 2 copies of all your images if a card becomes corrupt. But hold on, what if you drop your camera in the lake? Ooops, then you’d better…
…get your images off the camera asap and onto a computer. At this point you may wish to even save a 2nd copy to another backup drive. Most ingestion / transfer software can automate this backup process. Personally, here is what I do: I ingest and rename the raw files only. Once they are all on 1 hard drive, I then immediately run a one-button-push drive syncing utility, thereby backing up the entire drive that I’m working on. Once I have verified that I have 2 copies of the images on different hard drives, then – and only then – will I re-format the memory cards in the camera. Why reformat the cards in-camera? Well, that will have to be the subject of another article… ;-)
Consider conducting at least daily, even hourly, automated on-site backups – at least use Time Machine (Mac) or something similar. This way you can be sure to have several copies of your images, going back several days, weeks, months in the past, if necessary.
Get a copy of all your important data/images to another physical location (i.e. off-site). Seriously, houses do burn down, basements flood, and break-ins happen. If you have your back-up drive sitting just next to your main computer there’s still good chance that you could still lose both copies in the same stroke of bad luck. By having a third copy off-site, your chances or recovery have just improved immensely. The farther the distance between the two data sets, the higher the security. Obviously, cloud storage solutions (Dropbox, Google Drive, Amazon, etc..) can be ideal for this… if you shoot jpeg only. If you’re shooting RAW, however you’d better have a “fat pipe” internet connection because typical upload times for an ADSL connecion are probably too slow to be useful. For several hundred Gigabytes of data this this not a plausible solution. This is why I clone my backup drives and bring them to my office on a regular basis. My “lighter”, critical docs and images are sent to DropBox so there is some redundancy to farther locations as well.
Traveling – need I say it ?… Camera goes in carry-on bag – not checked luggage! At the very least – memory cards in your carry-on! I know some photographers that will also snail-mail a USB thumb drive back home with copies of their images, in the case that something happens to their carry-on. For extended trips of even more than a few days, consider moving at least jpeg copies to another medium/location (iPad, cell phone, Dropbox, laptop, etc.).
Hope this helps. Thanks for reading.
-Ted
Some equipment discussed in this post (advertising links) :
[amazon_image id=”B009TPDDFG” link=”true” target=”_blank” size=”medium” ]Synology DiskStation 2-Bay (Diskless) Network Attached Storage DS713+[/amazon_image] [amazon_image id=”B009ABM5YY” link=”true” target=”_blank” size=”medium” ]Synology 2-Bay Expansion Unit for Increasing Capacity Network Attached Storage DX213[/amazon_image] [amazon_image id=”B00E3RH61W” link=”true” target=”_blank” size=”medium” ]WD 4TB My Book Desktop External Hard Drive – USB 3.0 – WDBFJK0040HBK-NESN[/amazon_image] [amazon_image id=”B00LAJQVR6″ link=”true” target=”_blank” size=”medium” ]Nikon D810 FX-format Digital SLR Camera Body[/amazon_image]
update: November 2015 – this post was getting quite a bit of traffic on my old site (now closed), so I’ve migrated the page to this new address.Original post [June 13, 2012] : Some pics and a short video describing the modification for the [amazon_link id=”B00009XV7A” target=”_blank” ]Nikon TC-14E II (1.4x) Teleconverter[/amazon_link] to be used with non AF-S lens (including third party). This modification will void your warranty so you do so at your own risk. Based on the excellent info provided at Christophe Heyman’s page.